OpenStack Nova: configure multiple Ceph backends on one hypervisor

Configure a Nova hypervisor with more than one backend to store the instance's root ephemeral disks.
I. Rationale
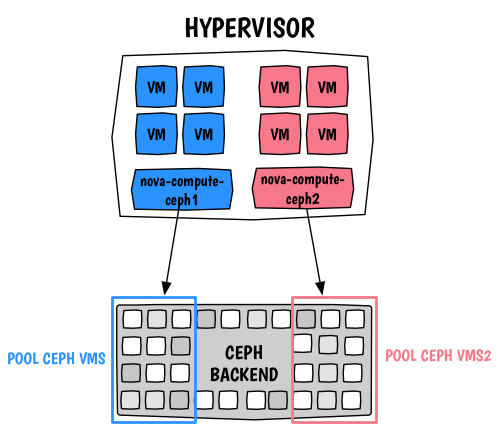
The main idea here is to be able to properly use the resources on your hypervisors. Currently, Nova does not support multiple image_type backends, which means different root ephemeral disks depending on the instance's flavor and this from a single compute node only. It is a bit like having a multi-backend support similar to Cinder where we could assign types. Since I do not want to have dedicated compute nodes per backend, I had to investigate a little bit to see if I could find a suitable solution. The solution works but is a little unconventional, however I believe it will be useful to anyone with limited number of compute nodes and various use cases.
One use case that I had in mind was to set different QoS capabilities on root ephemeral disks, however I did not want to be limited per hypervisor. Your can decide to offer different Ceph backends (with different speed etc...).
II. Configure Ceph
First we need to prepare the Ceph cluster, for this we will create two different pools.
$ ceph osd pool create vms 128
$ ceph osd pool create vms2 128
Eventually we create a key that will have write access to those two pools:
$ ceph auth get-or-create client.cinder mon 'allow r' osd 'allow class-read object_prefix rbd_children, allow rwx pool=volumes, allow rwx pool=vms, allow rwx pool=vms2, allow rx pool=images'
III. Configure OpenStack Nova
III.1. Nova.conf 
Since we are going to use host aggregates we need special scheduler filters, so configure your Nova scheduler with:
scheduler_default_filters=RetryFilter,AvailabilityZoneFilter,RamFilter,ComputeFilter,ImagePropertiesFilter,ServerGroupAntiAffinityFilter,ServerGroupAffinityFilter,AggregateInstanceExtraSpecsFilter
Now we are going to use two configuration files for Nova. The only way to differentiate those two Nova instances running on the same hypervisor is to use different host values. So these two will not reference a real node but more a logical entity. However those two need to be knows someone by your DNS instance or via the /etc/hosts file on your OpenStack controllers.
Our first nova-compute process will have the following nova-ceph1.conf:
[DEFAULT]
host = compute-ceph1

[libvirt]
images_rbd_ceph_conf = /etc/ceph/ceph.conf
images_rbd_pool = vms
images_type = rbd
Our first nova-compute process will have the following nova-ceph2.conf:
[DEFAULT]
host = compute-ceph2

[libvirt]
images_rbd_ceph_conf = /etc/ceph/ceph.conf
images_rbd_pool = vms2
images_type = rbd
Now you need to run your nova process like so:
$ nova-compute --config-file /etc/nova/nova-ceph1.conf --config-file /etc/nova/nova-ceph2.conf
If you are using systemd you can use the following unit file:
[Unit]
Description=OpenStack Nova Compute Server
After=syslog.target network.target

[Service]
Environment=LIBGUESTFS_ATTACH_METHOD=appliance
Type=notify
Restart=always
User=nova
ExecStart=/usr/bin/nova-compute --config-file /etc/nova/nova-ceph1.conf  --config-file /etc/nova/nova-ceph2.conf

[Install]
WantedBy=multi-user.target
Verify that it works as expected:
$ nova service-list
+----+----------------+---------------+----------+---------+-------+----------------------------+-----------------+
| Id | Binary         | Host          | Zone     | Status  | State | Updated_at                 | Disabled Reason |
+----+----------------+---------------+----------+---------+-------+----------------------------+-----------------+
| 1  | nova-conductor | deventer      | internal | enabled | up    | 2015-09-14T09:55:09.000000 | - |
| 2  | nova-cert      | deventer      | internal | enabled | up    | 2015-09-14T09:55:18.000000 | - |
| 3  | nova-network   | deventer      | internal | enabled | up    | 2015-09-14T09:55:11.000000 | - |
| 4  | nova-scheduler | deventer      | internal | enabled | up    | 2015-09-14T09:55:16.000000 | - |
| 6  | nova-compute   | compute-ceph1 | nova     | enabled | up    | 2015-09-14T09:55:12.000000 | - |
| 7  | nova-compute   | compute-ceph2 | nova     | enabled | up    | 2015-09-14T09:55:17.000000 | - |
+----+----------------+---------------+----------+---------+-------+----------------------------+-----------------+
I quickly (on purpose) skipped some bits of Nova's configuration for the Ceph backend, so things like the libvirt secret are not explained here. If you are not familiar with the configuration, please read the official documentation.
III.2. Host aggregates 
Now we need to logically separate these two hypervisors using host aggregates. For this we will create two aggregates:
$ nova aggregate-create ceph-compute-storage1
+----+-----------------------+-------------------+-------+----------+
| Id | Name                  | Availability Zone | Hosts | Metadata |
+----+-----------------------+-------------------+-------+----------+
| 1  | ceph-compute-storage1 | - |       |          |
+----+-----------------------+-------------------+-------+----------+

$ nova aggregate-create ceph-compute-storage2
+----+-----------------------+-------------------+-------+----------+
| Id | Name                  | Availability Zone | Hosts | Metadata |
+----+-----------------------+-------------------+-------+----------+
| 2  | ceph-compute-storage2 | - |       |          |
+----+-----------------------+-------------------+-------+----------+
Now we add our hypervisors to their respective aggregates:
$ nova aggregate-add-host ceph-compute-storage1 compute-ceph1
Host compute-ceph1 has been successfully added for aggregate 1
+----+-----------------------+-------------------+-----------------+----------+
| Id | Name                  | Availability Zone | Hosts           | Metadata |
+----+-----------------------+-------------------+-----------------+----------+
| 1  | ceph-compute-storage1 | - | 'compute-ceph1' |          |
+----+-----------------------+-------------------+-----------------+----------+

$ nova aggregate-add-host ceph-compute-storage2 compute-ceph2
Host compute-ceph2 has been successfully added for aggregate 2
+----+-----------------------+-------------------+-----------------+----------+
| Id | Name                  | Availability Zone | Hosts           | Metadata |
+----+-----------------------+-------------------+-----------------+----------+
| 2  | ceph-compute-storage2 | - | 'compute-ceph2' |          |
+----+-----------------------+-------------------+-----------------+----------+
Finally we set a special metadata that will be recognized by our Nova flavor later:
$ nova aggregate-set-metadata 1 cephcomputestorage1=true
Metadata has been successfully updated for aggregate 1.
+----+-----------------------+-------------------+-----------------+----------------------------+
| Id | Name                  | Availability Zone | Hosts           | Metadata                   |
+----+-----------------------+-------------------+-----------------+----------------------------+
| 1  | ceph-compute-storage1 | - | 'compute-ceph1' | 'cephcomputestorage1=true' |
+----+-----------------------+-------------------+-----------------+----------------------------+

$ nova aggregate-set-metadata 2 cephcomputestorage2=true
Metadata has been successfully updated for aggregate 2.
+----+-----------------------+-------------------+-----------------+----------------------------+
| Id | Name                  | Availability Zone | Hosts           | Metadata                   |
+----+-----------------------+-------------------+-----------------+----------------------------+
| 2  | ceph-compute-storage2 | - | 'compute-ceph2' | 'cephcomputestorage2=true' |
+----+-----------------------+-------------------+-----------------+----------------------------+
III.3. Flavors 
One last step is to create new flavors so we can decide on which logical hypervisor (and then on which Ceph pool we want our instances to run on):
$ nova flavor-create m1.ceph-compute-storage1 8 128 40 1
+----+--------------------------+-----------+------+-----------+------+-------+-------------+-----------+
| ID | Name                     | Memory_MB | Disk | Ephemeral | Swap | VCPUs | RXTX_Factor | Is_Public |
+----+--------------------------+-----------+------+-----------+------+-------+-------------+-----------+
| 8  | m1.ceph-compute-storage1 | 128       | 40   | 0         |      | 1     | 1.0         | True      |
+----+--------------------------+-----------+------+-----------+------+-------+-------------+-----------+

$ nova flavor-create m1.ceph-compute-storage2 9 128 40 1
+----+--------------------------+-----------+------+-----------+------+-------+-------------+-----------+
| ID | Name                     | Memory_MB | Disk | Ephemeral | Swap | VCPUs | RXTX_Factor | Is_Public |
+----+--------------------------+-----------+------+-----------+------+-------+-------------+-----------+
| 9  | m1.ceph-compute-storage2 | 128       | 40   | 0         |      | 1     | 1.0         | True      |
+----+--------------------------+-----------+------+-----------+------+-------+-------------+-----------+
We assign our aggregate special metadata to the flavours so we can distinguish them:
$ nova flavor-key m1.ceph-compute-storage1 set aggregate_instance_extra_specs:cephcomputestorage1=true
$ nova flavor-key m1.ceph-compute-storage2 set aggregate_instance_extra_specs:cephcomputestorage2=true
IV. Time to test!
Our configuration is complete so let's see how things work :). Now, I'm booting to instances on two different flavours:
$ nova boot --image 96ebf966-c7c3-4715-a536-a1eb8fc106df --flavor 8 --key-name admin ceph1
$ nova boot --image 96ebf966-c7c3-4715-a536-a1eb8fc106df --flavor 9 --key-name admin ceph2

$ nova list
+--------------------------------------+-------+--------+------------+-------------+------------------+
| ID                                   | Name  | Status | Task State | Power State | Networks         |
+--------------------------------------+-------+--------+------------+-------------+------------------+
| 79f7c0b6-6761-454d-9061-e5f143f02a0e | ceph1 | ACTIVE | - | Running     | private=10.0.0.5 |
| f895d02e-84f8-4e30-8575-ef97e21a2554 | ceph2 | ACTIVE | - | Running     | private=10.0.0.6 |
+--------------------------------------+-------+--------+------------+-------------+------------------+
They seem to be running, now we verify that the instances have been booted in their own Ceph pools:
$ sudo rbd -p vms ls
79f7c0b6-6761-454d-9061-e5f143f02a0e_disk
79f7c0b6-6761-454d-9061-e5f143f02a0e_disk.config

$ sudo rbd -p vms2 ls
f895d02e-84f8-4e30-8575-ef97e21a2554_disk
f895d02e-84f8-4e30-8575-ef97e21a2554_disk.config
Tada!
I really like this setup since it is really flexible, one thing that is a bit unclear at the moment is the behaviour of resources statistics. It will be tricky as it will simply be doubled... This might not ideal and unfortunately there is no way to mitigate that.